skip to main |
skip to sidebar
After a couple of week's FbF on other subjects, let's catch up with the Battle Off Samar. This time the USS HEERMANN (DD-532). HEERMANN screened transports and landing ships safely to the beaches of Leyte and then joined Rear Admiral Thomas L. Sprague's Escort Carrier Task Group 77.4 which was made up of three escort carrier task units, known as the three "Taffies" because of their radio call signs: "Taffy 1", "Taffy 2", and "Taffy 3". Destroyers HOEL and JOHNSTON joined her in screening Rear Admiral Clifton A. F. Sprague's unit, "Taffy 3" which also included his flagship FANSHAW BAY (CVE-70) and three other escort carriers.
Dawn of October 25, 1944 found Taffy 3 east of Samar steaming north as the Northern Air Support Group. Taffy 2 was in the central position patrolling off the entrance to Leyte Gulf, and Taffy 1 covered the Southern approaches to the Gulf some 130 miles to the southeast of HEERMANN. At 0645 Taffy 3's lookouts observed antiaircraft fire to the northward and with 13 minutes later were under heavy fire from Vice Admiral Takeo Kurita's powerful Centre Force of four battleships, 6 heavy cruisers, 2 light cruisers, and 11 destroyers. The battle off Samar was thus joined.
The only chance for survival of the little group of light American ships lay in slowing the advance of the enemy warships while withdrawing toward Leyte Gulf and hoped-for assistance. The carriers promptly launched their planes to attack the Japanese vessels, and the escorts promptly set to work generating smoke to hide the American ships.
HEERMANN, in a position of comparative safety on the disengaged side of the carriers at the start of the fight, steamed into the action at flank speed through the formation of "baby flattops" who, after launching their last planes, formed a rough circle as they turned toward Leyte Gulf. Since smoke and intermittent rain squalls had reduced visibility to less than 100 yards, it took alert and skillful seamanship to avoid colliding with friendly ships during the dash to battle. She backed emergency full to avoid destroyer escort SAMUEL B. ROBERTS and repeated the maneuver to miss destroyer HOEL as HEERMANN formed column on the screen flagship in preparation for a torpedo attack.
As she began the run, dye from enemy shells daubed the water nearby with circles of brilliant red, yellow, and green. HEERMANN replied to this challenge by pumping her 5-inch shells at one heavy cruiser, CHIKUMA, as she directed seven torpedoes at another, HAGURO. When these "fish" had left their tubes, HEERMANN changed course to engage a column of four battleships whose shells began churning the water nearby. She trained her guns on the battleship KONGO, the column's leader. Then she quickly closed HARUNA, the target of her of her last three torpedoes, which were launched from only 4,400 yards. Believing that one of the "fish" had hit the battleship, she nimbly dodged the salvoes which splashed in her wake as she retired. Japanese records claim that the battleship successfully evaded all of HEERMANN's torpedoes, but they were slowed down in their pursuit of the American carriers. The giant, YAMATO, with her monstrous 18.1-inch guns, was even force out of the action altogether when, caught between two spreads, she reversed course for almost 10 minutes to escape being hit.
HEERMANN sped to the starboard quarter of the carrier formation to lay more concealing smoke and then charged back into the fight a few minutes later, placing herself boldly between the escort carriers and the column of four enemy heavy cruisers. Here she engaged Japanese cruiser CHIKUMA in a duel which seriously damaged both ships. A series of 8-inch hits flooded the forward part of the plucky destroyer, pulling her bow down so far that her anchors were dragging in the water. One of her guns was knocked out but the others continued to pour a deadly stream of 5-inch shells at the cruiser, which also came under heavy air attack during the engagement. The combined effect of HEERMANN's guns and the bombs, torpedoes, and strafing from carrier-based planes was too much for CHIKUMA who tried to withdraw but sank during her fight.
As CHIKUMA turned away, heavy cruiser TONE turned her guns on HEERMANN who replied shell for shell until she reached a position suitable to resume laying smoke for the carriers. At this point planes from Admiral Stump's "Taffy 2" swooped in to sting TONE so severely that she too broke off action and fled. The courageous attacks of the destroyers and aircraft thus saved the outgunned Taffy 3.
Temporary battle-damage repairs were applied at Kossol Passage. From there, she was sent to Mare Island, California for a much-needed overhaul. She would not return to the Western Pacific until January 1945.
It's not the size of the ship in the fight .....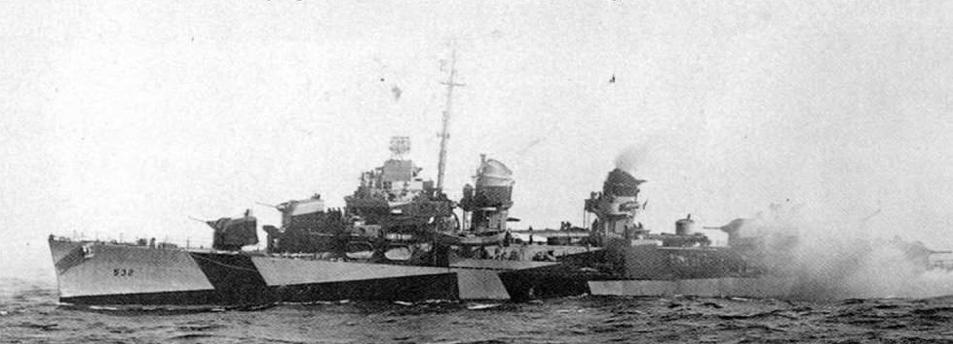


No comments:
Post a Comment